
How to Snip on Mac: A Comprehensive Guide
Snipping, or taking screenshots, is an essential skill for anyone using a computer, especially for Mac users. Whether you need to capture a portion of your screen for a presentation, save a memorable moment from a video, or share information with colleagues, knowing how to snip effectively can enhance your productivity. This article will guide you through the various methods of snipping on a Mac, including keyboard shortcuts, the built-in screenshot tool, and third-party applications.
Table of Contents
- Introduction to Snipping
- Using Built-in Mac Screenshot Tools
- 2.1. Keyboard Shortcuts for Snipping
- 2.2. Using the Screenshot App
- Snipping with Preview
- Third-Party Snipping Tools
- Tips for Effective Snipping
- FAQ Section
- Conclusion
- Additional Resources
1. Introduction to Snipping
Snipping refers to the action of capturing a portion of your screen. On a Mac, this can be done using built-in tools or third-party applications. Snipping is useful for various purposes, such as:
- Creating tutorials or guides
- Capturing images from websites
- Saving important information from documents
- Sharing visual content on social media
2. Using Built-in Mac Screenshot Tools
Mac computers come equipped with built-in tools that make snipping easy and efficient. Here are the primary methods to snip on a Mac:
2.1. Keyboard Shortcuts for Snipping
Mac offers several keyboard shortcuts for taking screenshots:
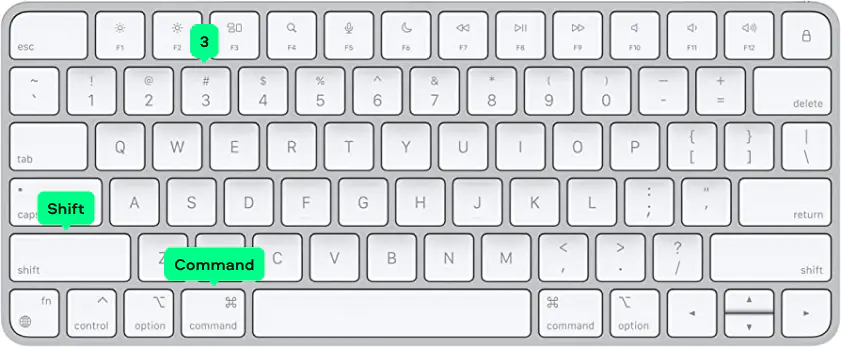
- Capture the entire screen: Press
Command (⌘) + Shift + 3. This captures the entire screen and saves the screenshot to your desktop. - Capture a selected portion of the screen: Press
Command (⌘) + Shift + 4. This changes your cursor to a crosshair, allowing you to click and drag to select the area you want to capture. Release the mouse button to take the screenshot. - Capture a specific window: Press
Command (⌘) + Shift + 4, then press theSpacebar. Your cursor will change to a camera icon. Click on the window you want to capture, and it will be saved to your desktop. - Capture the Touch Bar (if applicable): Press
Command (⌘) + Shift + 6to capture the Touch Bar.
2.2. Using the Screenshot App
In macOS Mojave and later, Apple introduced a dedicated Screenshot app that provides additional options for capturing and editing screenshots.
- Open the Screenshot app: Press
Command (⌘) + Shift + 5. This will bring up the screenshot toolbar at the bottom of your screen. - Choose your capture option: The toolbar provides options to capture the entire screen, a selected window, or a selected portion of the screen. You can also choose to record your screen.
- Set options: Click on “Options” to choose where to save your screenshot, set a timer, and enable or disable the floating thumbnail.
- Take the screenshot: Click on the desired capture option, and your screenshot will be taken according to your selection.
3. Snipping with Preview
Preview is a built-in application on Mac that allows you to view and edit images and PDFs. You can also use Preview to snip screenshots:
- Open Preview: Launch the Preview app from your Applications folder.
- Select “File” > “Take Screenshot”: From the menu bar, click on “File,” then choose “Take Screenshot.” You will see options to capture the entire screen, a selected window, or a selected portion.
- Follow the prompts: Choose your desired option, and follow the on-screen prompts to take your screenshot.
- Edit and save: After taking the screenshot, you can use Preview’s editing tools to annotate or crop the image before saving it.
4. Third-Party Snipping Tools
While Mac’s built-in tools are sufficient for most users, there are several third-party applications that offer additional features for snipping and editing screenshots. Some popular options include:
- Snagit: A powerful screen capture tool that allows for advanced editing, annotations, and sharing options.
- Lightshot: A lightweight snipping tool that enables quick screen captures and easy sharing.
- Skitch: An intuitive app from Evernote that allows for easy annotation and sharing of screenshots.
5. Tips for Effective Snipping
- Use keyboard shortcuts: Familiarize yourself with the keyboard shortcuts for quick access to snipping tools.
- Organize your screenshots: Create a dedicated folder for your screenshots to keep them organized and easily accessible.
- Annotate and edit: Use built-in editing tools or third-party apps to annotate your screenshots for clarity.
- Practice makes perfect: The more you use the snipping tools, the more comfortable you will become with capturing the content you need.
6. FAQ Section
Q1: How do I change where my screenshots are saved on a Mac?
You can change the save location in the Screenshot app by clicking on “Options” in the screenshot toolbar and selecting a different folder.
Q2: Can I edit my screenshots after taking them?
Yes, you can use Preview or third-party applications to edit your screenshots after capturing them.
Q3: Is there a way to take a screenshot of a scrolling window?
While macOS does not have a built-in feature for capturing scrolling windows, third-party apps like Snagit offer this functionality.
Q4: How do I take a screenshot of my entire screen without using keyboard shortcuts?
You can open the Screenshot app by pressing Command (⌘) + Shift + 5 and selecting the option to capture the entire screen.
Q5: What file formats are available for screenshots on a Mac?
Screenshots are typically saved in PNG format by default, but you can change the format to JPG, GIF, or TIFF in the Screenshot app’s options.
7. Conclusion
Snipping on a Mac is a straightforward process that can enhance your productivity and creativity. With built-in tools like keyboard shortcuts and the Screenshot app, as well as third-party applications, you can easily capture and edit screenshots for various purposes. By following the steps outlined in this guide, you’ll be well-equipped to snip effectively on your Mac.
8. Additional Resources
For more detailed information on taking screenshots on a Mac, you can refer to the following resource: Apple Support – Take a screenshot on your Mac.
| Topic | Description | Resources |
|---|---|---|
| Snipping Tools on Mac | Overview of built-in and third-party tools for capturing screenshots on a Mac. | Apple Support – Take a screenshot on your Mac |
| Keyboard Shortcuts | Common keyboard shortcuts for taking screenshots on a Mac. | |
| Using Preview | Steps to snip using the Preview application on Mac. | |
| Third-Party Applications | Popular third-party tools for enhanced screenshot capabilities. | |
| Tips for Effective Snipping | Best practices for capturing and managing screenshots. |
This article provides a comprehensive overview of how to snip on a Mac, including various methods and tips for effective use. If you have any further questions or need additional information, feel free to ask!


More Stories
How an Immigration Lawyer Helps You Navigate Complex Visa Rules
Is there a lifetime limit on epidural steroid injection?
What is Section 20 of the Motor Accident Insurance Act (Queensland)?